Sunday, September 23, 2012

Multi-generational quilting!

As you know, my Mom has also gotten into quilting, and after going to the big quilt show near me she bought a bunch of fabric to make (another) queen sized quilt.  I keep trying to explain to her that beginners don't necessarily have to start with quilts that are 90x90, but no... if she's going to make it, it's going to go on the top of a bed.

IMG_1562.jpg

Anyway, she slogged her way through 160 something small blocks using a really cool jelly roll of batiks and a shimmery fabric we found.  At the show she got a queen backer fabric of batik flannel in hot pinks and greens.

IMG_1561.jpg
I offered to help her layout and sew together the top.  Wow, it took a long time - I am REALLY not a fan of this step -  it looks SPECTACULAR.  This quilt is destined to go in my old room at their house where we (J and I) stay when I visit.   It has since gotten a thin border in the background fabric, and a thick one in a dark pink batik.  I did convince her to send it out to be quilted, so we'll see the finished project in a few months :)


We also had lots of Grammy/Isabella time. :)

IMG_1572.jpg
I do believe that quilting is definitely something best enjoyed multi-generationally.

Wednesday, September 19, 2012

The cutest backpack ever

When we last were chatting I was working my way through the Oliver+S book...

IMG_1589.jpg


Next stop on the Oliver+S book, a tiny small backpack!  I was originally going to make her the sweet little messenger bag, but she took a shining a backpack in the house.  It's way too big for her, but she enjoys to put it on, wave at me and say "bye bye, I'm going to school"  then about 30 seconds later comes running back.  She's such a sweetie.

IMG_1593.jpg

IMG_1595.jpg
The backpack is made from some pre-washed dark denim, the flowers were cut out and appliqued from this jazzy upholstery fabric that i bought at Ikea, it was originally going to be the messenger bag, but the print is just too big for the little bag, so I had a blast cutting out the colorful flowers for her little backpack.  The lining is some red fabric from ikea, it's heavier than quilting cotton but not quite upholstery weight.  I top stitched the entire thing with red thread, it looks so nice.

IMG_1597.jpg

IMG_1598.jpg

The silver clips were ordered from Etsy, I of course selected the retailer from Hong Kong so they took a month to get here, but they were perfect!

I am really proud how this came out, and can't believe how big my little girl is getting!
IMG_1596.jpg

Monday, September 17, 2012

First Quilt EVER!

Yep.

First quilt EVER!  and Isabella..
My first quilt with my first baby on the steps to my first house with my first cat.  Amazing.

This is it!  It was started in 1996-1997, it was over a Christmas break, during college when there isn't much to do (at least for me as an undergraduate).  I wanted a project, and bought this little pattern on a laminated pamphlet and some very pretty and (much too expensive for my budget) batik fabric.

I did not own a rotary cutter, quilting foot, walking foot, basting pins, spray glue etc... This was done with a wing and a prayer.  The border was completely improvised by me using the leftover scraps.

First quilt I ever Made
It was about done during that one month break, but I had NO idea how to bind it.  So after I got into quilting, 16 years later, my Mom reminded me about the almost done quilt in my closet.  I bought some forest green kona that matched the green batik and bound it up!!  It looks beautiful, and is ridiculously soft, it's insane how cuddly this is.

As I was hand sewing the binding on, I became nostalgic about what had happened in the 16 years since I had gotten the idea to learn to quilt.  I went to college, graduate school, got a job, bought a condo, got married, bought a house, had a baby, quit my job,  sold a condo and now am having another baby.  My life IS the one I was dreaming about during the nights at home during my Christmas break from college.  I'm so lucky and happy and thankful.

This quilt is so full of good karma I decided to pass it on to the folks at LAWS - Loudoun Abused Women Shelter - It's a great organization and I already had two baby quilts for them.  They are lovely, but this quilt is so special and full of good things I hope it can all rub off on the person who snuggles it's very soft fabric.


Wednesday, February 22, 2012

Lent

New Year's is a time when people evaluate their year and try to start fresh, for some reason I don't feel the need to make a change then, for me New Years is the warning bell that Lent is coming.  I probably have six weeks (at the most) to get ready for the real time for reflection and change.  Lent itself is six weeks long, which is theoretically a great amount of time to form new positive habits.

Every year I spend some time figuring out what improvements and sacrifices I can make during the time, in the past I have given up alcohol, sugar, or desserts, gone to the gym every day.  I have focused on being nicer to people, made an attempt to make at least 2 new friends.  This is of course is combined with regular church going and no meat on Fridays.

This year I'm going to give up alcohol and sugar, it will drive me crazy and hopefully help me "get healthy"  (which is a euphemism for thinner), but I'm also going to work on my procrastinating.  I have a problem getting things done that really need to get done, and then not giving myself any credit for the accomplishment.  I want to develop some habits over this period that make me more productive and able to really get things done and be proud of it. 

Specifically I need to take pride in my housekeeping, cooking and child-rearing.  It's an easy thing to say and supported by society but in the middle of the tasks, it feels like you never accomplish anything.  Coming from the working world which is full of "thanks" and rewards this is very different and it's taken me the last year to finally get into a rhythm.   I am hard on myself which is counterproductive.  Additionally, it has been almost a year since I started quilting.  I want to take this next year and take more risks and expand my horizons.  I want to knit more and create more and love it all. 

Friday, February 17, 2012

My Little Valentine

I'm working my way through the Oliver+S little things to sew book.  Next stop - the tutu!

IMG_1066.jpg


IMG_1063.jpg

Isabella doesn't really care that much about this stuff yet, but I figured I'll make it now,  and then when she does care and I have to make her a larger tutu, I can!  What's funny is I went to the fabric store, looking to buy 5 colors of tulle, 3/4 of a yard each.  I had Isabella with me, and she was running around and being a huge problem, and the woman cutting was moving (when you're holding down a squirmy toddler) so sloooooww.  I wandered off with the baby to get notions.  When I came back there was some tulle, I grabbed it up and ran out of the store as fast as possible.  Later, I was showing my husband my lovely tulle purchases and griping about how much it had all cost,  I unfolded the fabric and realized she had cut (and charged me) for 3.75 yards each... yeah that's WAY more!  So dilemma, do I make tutu's for everyone we know?  Do I attempt to bring it back?  We had to go back to the fabric store the next day anyway to pick up my aforementioned sewing machine, and I just happened to mention that i had gotten WAY too much fabric and was annoyed with myself for not checking.  The guy behind the counter said, oh, if its more than 3 yards you can return it!! SO I DID!  yay! and got the correct amount of tulle.

IMG_1072.jpg  
Tulle - pale pink, pink, dark pink, orange and yellow

What's unfortunate is the pattern calls for tulle that is 108" wide, and mine was only 54". so it's not as fully as I would like.  But it looks beautiful and the colors are very shimmery in the sunlight.  So lots of pretty pictures of my little Valentine in her pink tutu.

IMG_1054.jpg


Next stop more little dresses!

Monday, February 13, 2012

Return of the Sewing Machine


It's a thing, every now and again the machine needs to go in and be serviced.  It only takes a week (at least where I live) and really shouldn't be a big deal.  WELL IT WAS.  Apparently all it takes for me to be inspired to sew is the loss of my machine, figures, that's how deep the anti-authority issues run, oh you can't sew... OH THAT'S ALL I WANT TO DO!!  - Actually what really happened was the store said "Two weeks", so one week later i went back to buy some fabric figuring I'd get everything cut and ready to go for when the machine got back, after a frustrating morning I got home to a message on the home phone (left while i was AT the fabric store) telling me my machine was ready!

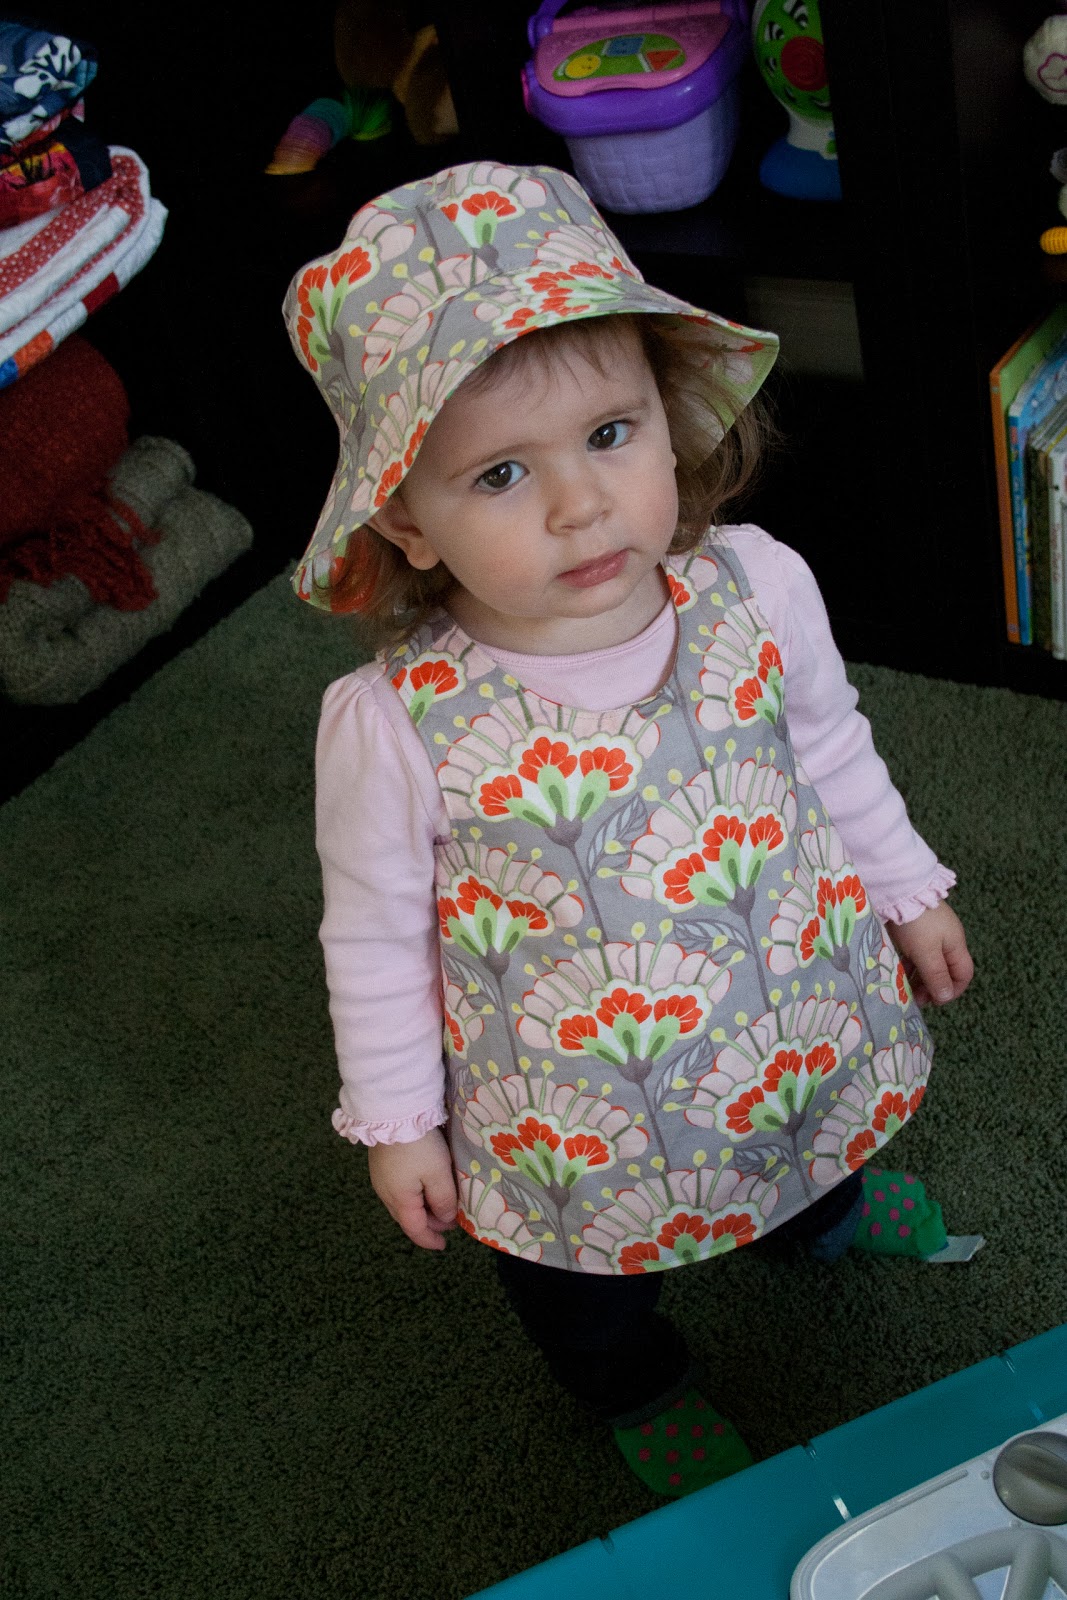
So it's BACK!  Hooray, and as you can see I've been busy creating a wardrobe for my baby out of Kate Spain's "Good Fortune".  Usually when I see a stack of fabric I see a quilt, this time I saw a bunch of baby clothes, so here is round one!
With Elmo
It's a pattern from Heidi and Finn, so cute.  It's a reversible pinafore with an oliver+s bucket hat, a pattern in this book.  They are just the most perfect patterns.  I'm excited to try some more of them!
Dancing!!  (and showing the beautiful back of this pinafore)
As you can see, 1 - 1/2 yard pieces of fabric perfectly accomadated the pieces for one side.


Did I mention both are reversible?
Mommy, are we done with the pics?
Look for a spring wardrobe out of Good Fortune, perfect adorable clothes for adorable girls :)

Wednesday, February 1, 2012

D.C. Metro Quilt - Revisited and Pattern

Well hello again!  I come and go, you know..

WELL last year, I showed you a D.C. Metro Map quilt!  I was pretty excited about it - so now I have written up a pattern for you to download!  A proper .pdf!  It's in color and is 8 pages long.  It only covers how to make the quilt top.  There are loads of tutorials out there on how to make the quilt sandwich, quilt, and bind the quilt so I leave that up to you!  (The pattern is free after all)


So my quilty friends enjoy :)  I want to see lots of D.C. Metro maps!  Frankly I hope this inspires you to make a metro map (or bus route map...) of your hometown!

Download link: DC Metro Quilt Pattern

Wednesday, January 4, 2012

Hawaii Quilt - Complete!

It's Done!  I can't even believe it, five and a half years after I envisioned it I have completed it!   I am thrilled.

Baby and Hawaii Quilt

Hawaii Quilt

A friend of mine owns not one, but two long arm machines, she has graciously allowed me to use one of them whenever.  I went over and began to do the tight meander that I had seen so many times.  The issue... childcare.  I am the childcare, and Isabella wasn't all that cooperative while I was trying to quilt, and a babysitter in the middle of the day seemed impossible.  I was still breastfeeding... So with the quilt about 7/8 done on the longarm I had to abandon it, sad sad day.  My friend offered to finish it for me, and a few weeks ago she brought it over ALL DONE!!  It is so flat and smooth, my straight line quilting has improved, but it's not as nice as this yet, I still get puckers.

Close up front Hawaii quilt

Hawaii Quilt- chair

I am so excited and I MACHINE bound this!! I'm learning!  It's not so horrible!  This is my fifth attempt at machine binding and I may have finally gotten the hang of it.  Hooray! It feels so good to have this completed.

Back of Hawaii Quilt

Read Here and here and here if you want to catch the back story on this quilt.

Tuesday, January 3, 2012

Rainbow Quilt with Tutorial

IMG_0865.jpg


For my birthday I received the Kona "Dark" Fat Quarter box, it was very exciting, and really until now I have hardly used it!  Then I saw the Crossroads quilts over at Red Pepper Quilts.  They were so cool!  Such a simple design!  So many colors!  I decided I could make one!  I also think I can explain it!  So everyone can make it!

IMG_0864.jpg

On New Years eve I picked out 28 colors.  I wasn't looking for that many, I knew I wanted at least 24, and I settled on 28.  (They are listed below).  An even number will ensure that the middle color is different on either side, and odd will result in a solid strip across (if that's what you're looking for)

IMG_0860.jpg

First cut two:  2"x 22" strips from each of the 28 fabrics, and line them up on your idea board.
Next iron them all with spray starch to help them stay straight.

IMG_0863.jpg
From the top left: Navy, Windsor, Copen, Turquoise, Pacific, Surf, Deep Blue, Teal Blue, Emerald, Jade Green, Clover, Grass Green, Curry, Canary, Papaya, Orange, Coral, Red, Ruby Crimson, Brick, Chocolate, Pepper, Purple, Hibiscus, Cerise, Pomegranate, Bright Pink
Carefully sew them all together, and iron the seams open.
Repeat for the second side.

At this point I had alot of rough edges and selvedges that needed to be cut off, so I trimmed everything up.  RPQ made her sides different widths for interest, you could make four chunks and alternate them... I like the idea of this being divided down the middle.

I then pinned all the matching seams together and sewed down the middle.  I used a 3/8" seam allowance, not exactly sure why but it just seemed like a good idea. Pressed, and voila!  Quilt top!

IMG_0866.jpg

The quilting is 3/8" away from all the seams on either side, including the one down the middle.   I debated making the grid like RPQ did, but I was running out of thread, and decided this was plenty of quilting. I used silvery thread that exactly matched the backing fabric (Kona Ash).

IMG_0867.jpg
The finished size is about 40"x45"

I think this looks fantastic, and considering I started at 10pm on New Year's eve and finished on 2 Jan, I couldn't be happier! The back is Kona Ash, and it's bound in Kona Black.   I'm pretty sure there will be a baby Colorist quilt with these same colors arriving soon!


IMG_0870.jpg

Saturday, December 31, 2011

Happy New Year!

It's been a wonderful year, I have had a blast sharing my projects!  Here's a look back at some of the things I have accomplished!


2011 Mosaic

I'll catch you guys next year :)

Thursday, December 29, 2011

I Love Ikea Fabric


All together now!

This past summer I picked up some bolts of fabric at Ikea, they are about 3 yards each and the fabric is 50" wide.  They were $4, I should have picked up more!  I got one stripe in both red/orange and one in blue/green.  I have now made seven pillows!  They are so bright and refreshing.  There is even more fabric leftover! 

variation 1 - green blue- smiling baby
Isabella is an excellent pillow model!

variation 1- red/orange
Red/Orange Stripe - 18" pillows

variation 2
20" Pillows

Basket weave
Basketweave pillow -  20"

I went back to Ikea this fall looking for more fabric, I wanted to make some cute Amy Butler floor pillows, but it wasn't there!  Boo!  Hopefully it will come back.  Frankly I'm debating putting some wide stripes on Spoonflower so I can make more things. :)

I quilted the tops of the pillows and put fusible interfacing in the back, it's just a flap that I embellished with a smidge of the stripe.  The pillows are soft and feel very nice.  It is just the 2 sets of stripes that I manipulated in as many was as possible!

Back of the pillows
The backing fabric is all from ikea (save the orange flannel)  It's all adorable.

And to plug my triangle calculator. I used it to make all but the basketweave.

This blog post is a bit late because the floor pillows are causing me some trouble, today I was able to sort them out and I hope to be finishing them in the next day or so.  I tried something tricky... It will be OK, but it's taking forever.

Tuesday, December 27, 2011

The Colorist

So I got this done in 2 naps and one evening.  That is how I measure time. :)  That is CRAZY fast!!  My Parents are in town for the holidays and my Mom was able to help, which does speed things up significantly, but Wow, to have a completed beautiful top in 2 afternoons of work plus a little evening time is just madness!!  It looks amazing and I learned some new skills on this.

The Colorist - Top


1. Spray starch is the greatest thing ever - and now I know what my Grandma smelled like.
2. Lizzy House knows how to write a legible, outstanding pattern - at no point do you need to google "tips on completing the pattern" which is an essential step with EVERY SINGLE Amy Butler pattern.  Love you Amy, but seriously.
3. Ripping fabric is how I'm cutting fabric from now on.  One little snip, and *rrrriiip* and a perfect line, so satisfying
4. Curved seams are OK, just go slow and ease it through and it will be just fine

The Colorist - Close up - the top

So I'm totally thrilled.  I have some other things to work on while I wait for the backing fabric to arrive.  I hope to ship this out to a quilter, I've never done that before but I love the concentric circles and I really cannot do that on my sewing machine.

Sunday, December 25, 2011

Merry Christmas and the Colorist

Merry Christmas!!

It was a happy one for me, under the tree I found this pattern!  (Actually times 2 due to some communication issues between husband and mother) But it's totally great since I want to make the baby and the big quilt more than once (depending on how hard it is...)

IMG_0807.jpg

Anyway, after the baby went to sleep my hubby and I quick went to work picking out 30 fabrics to make the rainbow.  Here is the final selection!

Stack of fabric for Colorist


Hubby wants me to make the baby one with only solids.  I think since he got me the Kona dark box for my birthday he's eligible to make requests :)

I have so many projects in the making!  I hope to share more soon.


Saturday, December 10, 2011

Saturday Projects

After making myself a snazzy iPad cover, I decided to make my Mom a new one.  This one is fully washable!  It has some cute Ikea striped fabric in it, and at her request is of course lined with fleece


Mom's New Ipad2 cover

Mom's New ipad2 Cover


It fits more loosely but still cleans the front of her iPad. I have found this is a great quick project to whip on on the same Saturday that we purchased a ENORMOUS Christmas tree that we now need to decorate. It's 12 feet and amazing!

I also noticed that my husband's laptop was starting to take the finish off our kitchen table. Nothing serious yet, but I like that table and he likes to work there... SO I made him an extra large insulated place mat.
Computer Mat

The fabric is Daisy Mae by DS for Joann, and I really thought that turquoise and navy print looked like a keyboard! It's moderately masculine and very soft.

Computer Mat

Computer Mat

I bought a quarter yard of the prints you see there and definitely have enough to make at least one more if not two. There is potholder material in the middle, and I just turned it right side out and zig-zagged the edges. It's not too fancy but it's getting the job done, and is machine washable.

A very productive Saturday!

I think I want to try and make a messenger bag.  Isn't it just a larger iPad holder, with a strap?  I think it's totally doable, so look for that soon!

Saturday, December 3, 2011

Sexy Hexy Christmas Quilt

Back in July (I think) I bought ALOT of Kate Spain's Flurry Fabrics. I have yard pieces, and half yard pieces, I'm pretty sure I have all of them. Additionally I got flannel that coordinated. I had no plan whatsoever but wanted to make a cute Christmas quilt for Isabella.

IMG_0633.jpg
The stack of fabric is enormous, so I think I'm going to make at least 3 quilts and the first one is Sexy Hexy by Amy Butler. 
It's a free downloadable pattern. Like all Amy Butler patterns I have (Weekender bag, Gum Drop pillow, and Honey Bun pouf) it is VERY VERY over-engineered. The directions for this quilt were no exception - 11 pages long. Let's be fair, the last 6 pages are pattern pieces but if you read down the supplies list there is so much stuff and then the directions are so involved by the time you actually get to sewing I'm pretty sure you don't care about the quilt anymore. After Googling "Sexy Hexy Love Quilt", and searching around on Flickr I realized that not many people have made this quilt, and I'm sure the 100% reason is the horrendous long-winded instructions that make this project seem much harder than it is. Luckily before I gave up and switched to something else I found this blog post, and suddenly the quilt was simple.  Here are some good guidelines:

1. Follow the instructions to assemble the pattern page first, it's clever and works well.
2. Cut out the templates A, C and D these are used to make the full sized Hexagons
3. Do not add seam allowance to the A shape, it doesn't need it and looks weird.
   -I put lightweight fusible interfacing on A - it get's appliqued and I think it looks/works better
4. Work one Hexagon at at time, cutting out one center, then six sides of template C then six of D,
   -I used a pencil and traced the shapes on the fabric then cut out with scissors

**note template D takes 1/4 yd of fabric for one hexagon, template C takes more than 1/8 but less than 1/4

5. Sew C to D six times as shown in a picture on the instructions, press, then sew them together to form the outside of the hexagon, press.
6. Applique A to the center, I used 2 pins per side (I NEVER use pins for anything so this is a big deal for me)
7. Repeat until you have seven hexagons, it's six surrounding one in the center - for planning purposes.

IMG_0634.jpg

I like this method because you can build each hexagon as you go based on what you want the final quilt to look like.  I have only made a few, but they are pretty easy and I think look pretty awesome.

IMG_0636.jpg

Another cool idea would be to make "string blocks"  cut out the side templates out of wonky cut - sewn together strips. 

The rest of the quilt is 1/2 hexagons which seem to be pretty straight forward and then these little side pieces which also don't seem hard.  I am apprehensive about Y seams, but I'm going to skip the directions and look on you tube.  I'll be happy to post links and tips then.

Happy Christmas Hexing!